
A small attic bathroom presents one of interior design’s most satisfying puzzles — how to fit a complete, functional bathing space into a compact room defined by sloped ceilings, limited floor area, and awkward geometry. The answer lies in embracing the constraints: using the slopes to determine fixture placement, treating every wall niche as a storage opportunity, and choosing fittings specifically suited to compact proportions.
Here are 20 small attic bathroom ideas spanning corner showers, floating vanities, skylight illumination, space-saving fixtures, and clever storage solutions — each one demonstrating how to create a bathroom that is genuinely complete despite its compact dimensions.
1. Corner Shower for Space-Efficient Bathing

A triangular corner shower enclosure with frameless glass fits naturally into the corner of a small attic bathroom, using a section of floor where two walls meet — space that no other fixture could occupy as efficiently.
- Ensure the shower head is positioned at the corner’s tallest point — at least 78 inches from the shower floor.
- Use a linear drain along one wall of the corner shower rather than a centre drain for easier floor slope management.
- Choose large-format tiles inside the corner shower to minimise grout lines and make the enclosure feel larger.
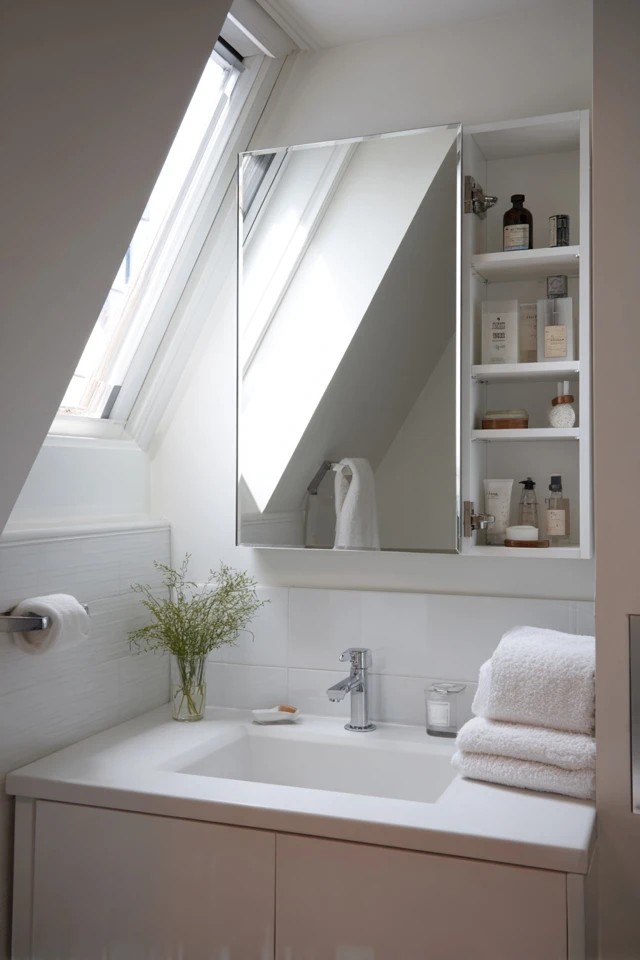
2. Wall-Mounted Floating Vanity for Open Floor Space

A wall-mounted vanity suspended above the floor eliminates the visual weight at floor level that a traditional standing cabinet creates, making the small attic bathroom feel significantly more open and spacious.
- Build the vanity to a custom depth that fits the available wall space without protruding into the bathroom’s circulation area.
- Mount the vanity on concealed wall brackets rated for the combined weight of the unit, basin, and stored contents.
- Choose a vanity with push-to-open drawers rather than handles for the cleanest possible profile beneath the low slope.
3. White Subway Tile for Bright Classic Wall Treatment
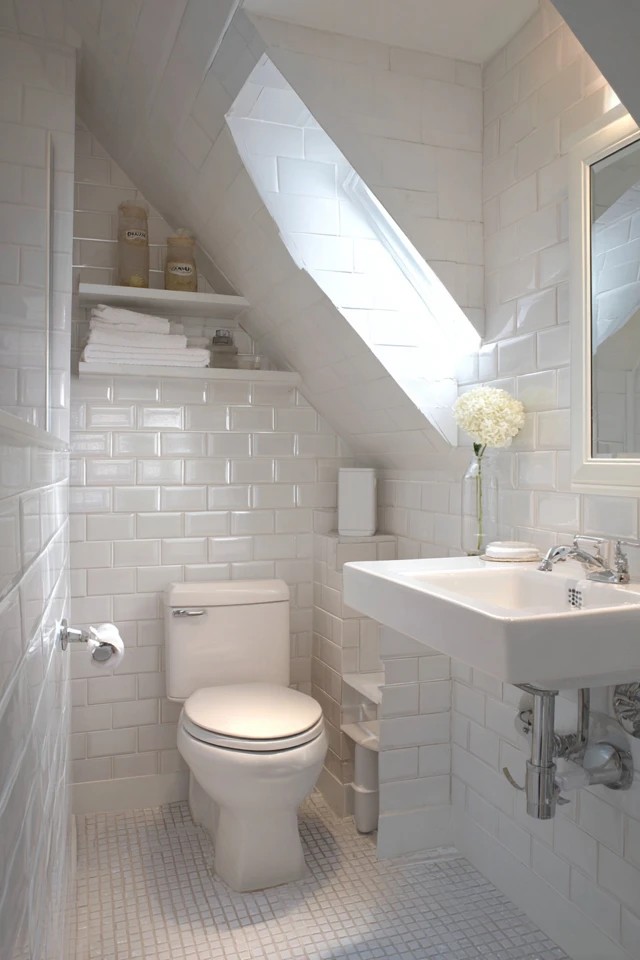
White subway tiles in a classic running bond pattern create the most reliably bright and timeless wall treatment for a small attic bathroom — the reflective white ceramic surface bounces natural and artificial light throughout the compact space, and the simple rectangular format suits both traditional and contemporary bathroom aesthetics equally well. Grey grout adds subtle visual definition without darkening the room.
- Use 3×6-inch subway tiles on the walls and a different format on the floor to create surface variety.
- Choose a mid-tone grey grout — not too dark, not too pale — for the most versatile and long-lasting definition between tiles.
- Carry subway tile from floor to ceiling on all wet-zone walls for the most resolved, fully considered wet-area finish.
4. Skylight for Overhead Natural Illumination

A skylight set directly into the sloped ceiling above the shower or bath position provides the most valuable natural light available in any bathroom — overhead, diffused, and exceptionally flattering for bathing.
- Install a skylight with an integral opening mechanism to provide essential steam ventilation as well as natural light.
- Choose a skylight with an integrated diffusing screen or privacy blind for the shower position.
- Specify a low-e glazed unit to reduce heat gain in summer and heat loss in winter through the roof aperture.
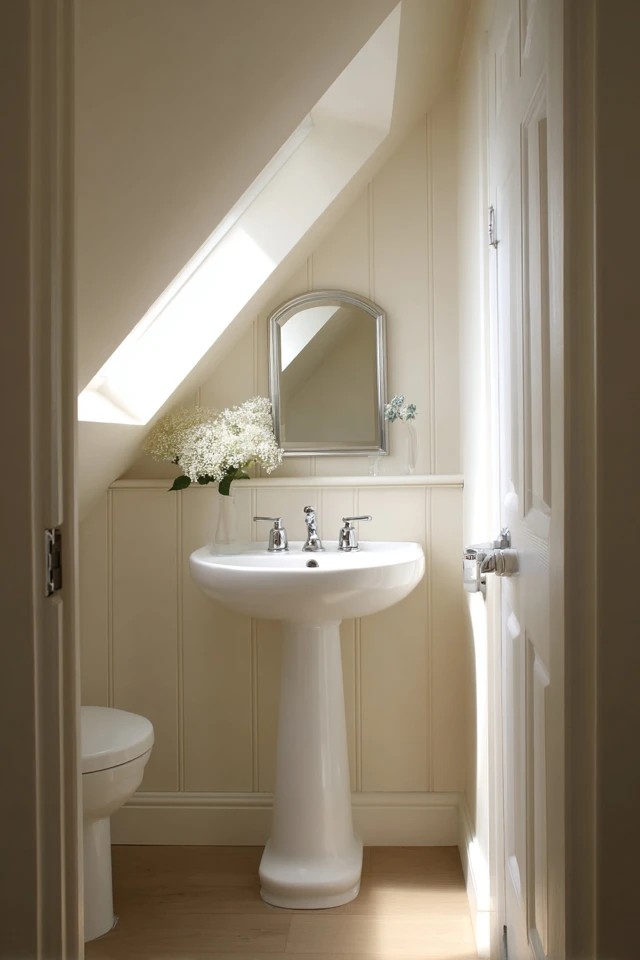
5. Pedestal Sink for Minimal Floor Footprint

A pedestal sink with its slender column base occupies the smallest possible floor footprint of any freestanding basin, making it ideal for a small attic bathroom where every square inch of clear floor is genuinely valuable. The classic form is equally at home in vintage-inspired and contemporary schemes, and the visual lightness of the pedestal creates a sense of space that a vanity cabinet beneath the basin would completely suppress.
- Install a small shelf or wall-mounted cabinet nearby to provide the toiletry storage that the absent vanity cabinet would have offered.
- Choose a pedestal with a wider basin bowl than the column base to maximise usable basin depth in the tight space.
- Position the pedestal in the area with the greatest floor-to-ceiling height so it can be used comfortably when standing.
6. Built-In Shelving Niche for Recessed Wall Storage

A tiled shelving niche recessed into the wall between studs provides storage for toiletries, shampoos, and bathroom accessories without projecting a single centimetre into the bathroom’s limited floor space.
- Position the shower niche at elbow height — approximately 48-54 inches from the shower floor — for the most ergonomic access.
- Use the same tile as the surrounding wall inside the niche for a seamlessly integrated appearance.
- Slope the niche floor very slightly toward the shower to allow water to drain out naturally without pooling.
7. Sloped Ceiling with Exposed Beam for Rustic Architectural Character
An exposed structural beam beneath the sloped ceiling of a small attic bathroom adds the kind of authentic architectural character that transforms a potentially awkward space into a genuinely charming one.
- Seal exposed beams in a bathroom with a water-resistant finish to protect against steam and condensation over time.
- Use the beam’s position as a guide for positioning the vanity mirror directly beneath it for a composed architectural relationship.
- Ensure adequate ventilation to prevent moisture accumulation around exposed wood in the humid bathroom environment.
8. Pocket Door for Space-Saving Entry

A pocket door that slides into the wall cavity eliminates the swing clearance that a hinged door requires — typically 10-12 square feet of floor space that a small attic bathroom genuinely cannot afford to sacrifice.
- Install a double-stud wall frame at the door opening to accommodate the pocket door’s hidden housing mechanism.
- Choose a lever-style pocket door pull rather than a round knob for the most comfortable operation in the tight bathroom entry.
- Ensure the pocket door cavity does not conflict with any plumbing or electrical runs in the wall it enters.
9. Hexagonal Floor Tiles for Vintage Pattern Character
Small white hexagonal floor tiles in a classic black-and-white pattern create a small attic bathroom floor with genuine period character and visual interest.
- Use a 2-inch hexagonal scale — larger sizes look clumsy in a compact bathroom floor area.
- Choose mid-grey grout rather than black for the hex pattern — black grout is difficult to maintain white over the long term.
- Carry the hex pattern under the vanity and into the base of the corner shower for a cohesive floor treatment throughout.
10. Mirror Medicine Cabinet for Dual-Function Efficiency

A mirror medicine cabinet — combining a mirrored face with a shelved interior for toiletry storage — delivers two essential bathroom functions in the wall space directly above the vanity.
- Choose a recessed model that fits between standard stud spacing to avoid protruding into the limited bathroom space.
- Select a cabinet with an adjustable interior shelf to accommodate bottles of varying heights efficiently.
- Install the cabinet centred on the basin below rather than on the wall in general for the most practical grooming position.
11. Compact Soaking Tub Under the Slope for Spa Luxury

A compact Japanese-style soaking tub — typically 35-45 inches long and 25-28 inches deep — fits beneath the lowest section of the attic bathroom slope where a standard tub’s length would be impossible.
- Choose a freestanding soaking tub rather than a built-in for the most flexible positioning beneath the slope.
- Ensure the hot water supply can maintain the tub’s temperature throughout an extended soak — Japanese tubs retain heat well but require adequate supply.
- Position the tub so the occupant’s head is at the highest ceiling point for the most comfortable reclining position.
12. Towel Hooks Instead of Bars for Space-Saving Storage

Individual towel hooks mounted directly on the wall require a fraction of the projection depth of a towel bar — important in a small attic bathroom where every centimetre of clear floor and circulation space matters.
- Mount hooks at two different heights — 60 and 72 inches — to accommodate both children and adults without separate installations.
- Choose hooks in a consistent metal finish that coordinates with the tap, showerhead, and other bathroom hardware throughout.
- Space hooks at least 8 inches apart to allow hung towels to air-dry effectively without overlapping contact.
13. Neutral Colour Palette for Visual Calm and Expansion

A palette of whites, warm beiges, and soft greys creates the most visually calm and spatially generous atmosphere available to a small attic bathroom — the neutral ground allows the eye to move freely across surfaces without colour contrast creating visual boundaries that emphasise the room’s compact dimensions.
- Use the same pale neutral on all wall tiles and painted surfaces to eliminate boundaries that make small rooms feel smaller.
- Introduce texture variation through fixture and accessory selection rather than through contrasting colour areas.
- Reserve any single accent colour — a dark grout, a coloured towel — for one deliberate, minimal application only.
14. Frameless Glass Shower for Open Visual Flow

A frameless glass shower enclosure — no metal frame, no opaque panels, no visual interruption — maintains the continuous sightline from one end of the small attic bathroom to the other, making the room feel significantly larger than its actual dimensions.
- Use 10mm tempered glass as a minimum thickness for frameless panels — thinner glass flexes and creates alignment problems over time.
- Install a single fixed panel with a hinged door rather than two hinged doors for the most structurally stable frameless enclosure.
- Clean frameless glass weekly — the fully transparent surface shows water marks and soap residue more clearly than framed alternatives.
15. Toilet Under the Lowest Ceiling for Smart Fixture Placement

Positioning the toilet under the section of the attic bathroom where ceiling height is lowest — typically less than 5 feet — is the most spatially intelligent fixture placement decision available, since toilet use requires seated rather than standing clearance.
- Ensure a minimum of 15 inches from the toilet centre to any side wall or obstacle for safe, comfortable seated use.
- Install a wall-hung toilet with a concealed cistern in very low-ceiling zones to eliminate the projecting tank overhead.
- Provide at least 24 inches of clear floor space in front of the toilet for comfortable access even in a sloped-ceiling zone.
16. Oversized Wall Mirror for Visual Space Multiplication

A large frameless mirror mounted on the flattest available wall of the small attic bathroom creates the single most impactful visual space enhancement available — reflecting the opposite wall, the natural light, and the room’s full depth back into itself to create the convincing impression of a bathroom twice the actual size.
- Size the mirror as large as the available flat wall section permits — there is no such thing as too large a mirror in a small bathroom.
- Position the mirror to reflect the skylight or window directly for maximum natural light multiplication in the space.
- Use mirror adhesive or specialist mirror clips for installation — standard picture hooks are not rated for large bathroom mirror weights.
17. Rain Showerhead for Spa-Quality Bathing Experience

A rain showerhead mounted overhead rather than at a standard wall-mounted height delivers a genuinely luxurious waterfall bathing experience in the small attic bathroom’s corner shower.
- Choose a rain showerhead with at least a 200mm diameter for a genuinely immersive rainfall effect during bathing.
- Ensure sufficient water pressure — rain showerheads typically require higher pressure than standard heads to function well.
- Install a thermostatic valve rather than a standard mixer for precise temperature control without scalding risk.
18. Wood Accent Vanity for Scandinavian Organic Warmth

A vanity in light oak or natural pine brings the organic warmth and material honesty of Scandinavian design into the small attic bathroom, balancing white-tiled walls and chrome fixtures with the natural warmth of wood grain.
- Apply a water-resistant hardwax oil finish to the wood vanity to protect against steam and splashes without adding an artificial sheen.
- Choose solid wood or genuine veneer rather than wood-effect laminate for authentic grain depth and long-term durability.
- Pair the wood vanity with white wall tiles and brushed nickel fixtures for the cleanest Scandinavian composition available.
19. Wall Sconces for Focused Grooming Illumination

Wall sconces mounted on either side of the mirror rather than overhead provide the most flattering and practically useful grooming light in a small attic bathroom — the side-lighting illuminates the face evenly from both angles, eliminating the harsh shadows that overhead fixtures create.
- Mount sconces at approximately 60 inches from the floor — at eye level — for the most even, shadow-free face illumination.
- Choose sconces with a warm-white light source (2700-3000K) to render skin tones accurately for grooming purposes.
- Select fixtures in a metal finish that matches the tap, showerhead, and towel hooks for a cohesive hardware scheme.
20. Vertical Stripe Wallpaper for Height Illusion

Vertical stripe wallpaper in a waterproof or moisture-resistant format creates a strong upward visual direction that makes the small attic bathroom’s ceiling feel higher than it actually is — the lines draw the eye upward and elongate the room’s perceived proportions.
- Choose vinyl or moisture-resistant wallpaper specifically rated for bathroom humidity levels — standard wallpaper will peel and degrade.
- Use a narrow stripe width — 1-2 inches — for the most refined, proportionally appropriate result in a small bathroom.
- Apply the stripe wallpaper to a single feature wall rather than all four walls to maintain visual calm alongside it.
Why These Small Attic Bathroom Ideas Excel
Every idea on this list succeeds because it addresses the small attic bathroom’s specific and simultaneous challenges: limited floor area, sloped ceilings that restrict fixture placement, limited natural light, and the need to include every essential bathroom function in a compact footprint. The most effective small attic bathroom designs treat these constraints as a design brief rather than a set of problems — each constraint is answered by a specific design decision.
Space efficiency — corner showers, floating vanities, pedestal sinks, pocket doors, wall niches, and towel hooks rather than bars — is the foundational design principle that everything else builds upon. In a bathroom of 30-50 square feet under a sloped ceiling, every centimetre of floor, wall, and ceiling space is genuinely valuable, and the ideas on this list consistently prioritise solutions that deliver maximum function from minimum physical volume.
Light maximisation — skylights, white tiles, frameless glass, large mirrors, and wall sconces — is the second essential principle. A small bathroom that is dark feels oppressive; a small bathroom flooded with natural and well-directed artificial light feels airy and comfortable regardless of its dimensions. The skylight is the most transformative single investment a small attic bathroom can receive, and every reflective surface in the room compounds its effect.
Visual expansion through neutral palettes, frameless glass, floating fixtures, large mirrors, and vertical stripe wallpaper works alongside physical space efficiency to create a room that feels considerably larger than it measures. These visual techniques do not change the actual dimensions — they change how those dimensions are perceived, and in a compact space, that perceptual difference is as valuable as gaining an additional square foot of real floor area.
Conclusion
A small attic bathroom designed with intention and spatial intelligence can be genuinely complete, beautiful, and comfortable — not a compromised bathroom but a cleverly made one. Begin with fixture placement informed by ceiling heights, install a skylight wherever the roof structure permits, choose space-efficient fittings throughout, and use light-reflective surfaces to maximise the brightness that natural light provides. Approach every design decision as an opportunity to gain function, light, or perceived space, and the constraints of the attic will feel less like limitations and more like the design brief for a distinctive and memorable bathroom.

Andrew is the founder and lead writer at RoomBlossom, a home decor publication dedicated to practical, intentional interior design. With over 10 years of hands-on experience transforming real-world living spaces — from compact apartments to full attic conversions — Andrew specialises in room design that balances visual appeal with everyday function. His work spans living rooms, bedrooms, sunrooms, and attic spaces, always guided by the belief that great design should work for the people who live in it, not just look good in photographs.